

Plans and the Gantt
A plan is the schedule of a workspace’s work. It’s a list of items, each with dates, an assignee, a status and the other details you need to run the work. Open the active workspace’s plans from Plans in the sidebar.
One plan, five views
Section titled “One plan, five views”Every plan has five tabs that show the same items in different ways:
| Tab | Shows |
|---|---|
| Table | Items as rows, grouped and editable in place |
| Gantt | Items as bars on a timeline, with dependencies |
| Kanban | Items as cards in Planned, In progress, Blocked and Done columns |
| Calendar | Dated items by month |
| Canvas | The experiment map behind the plan, if it has one |
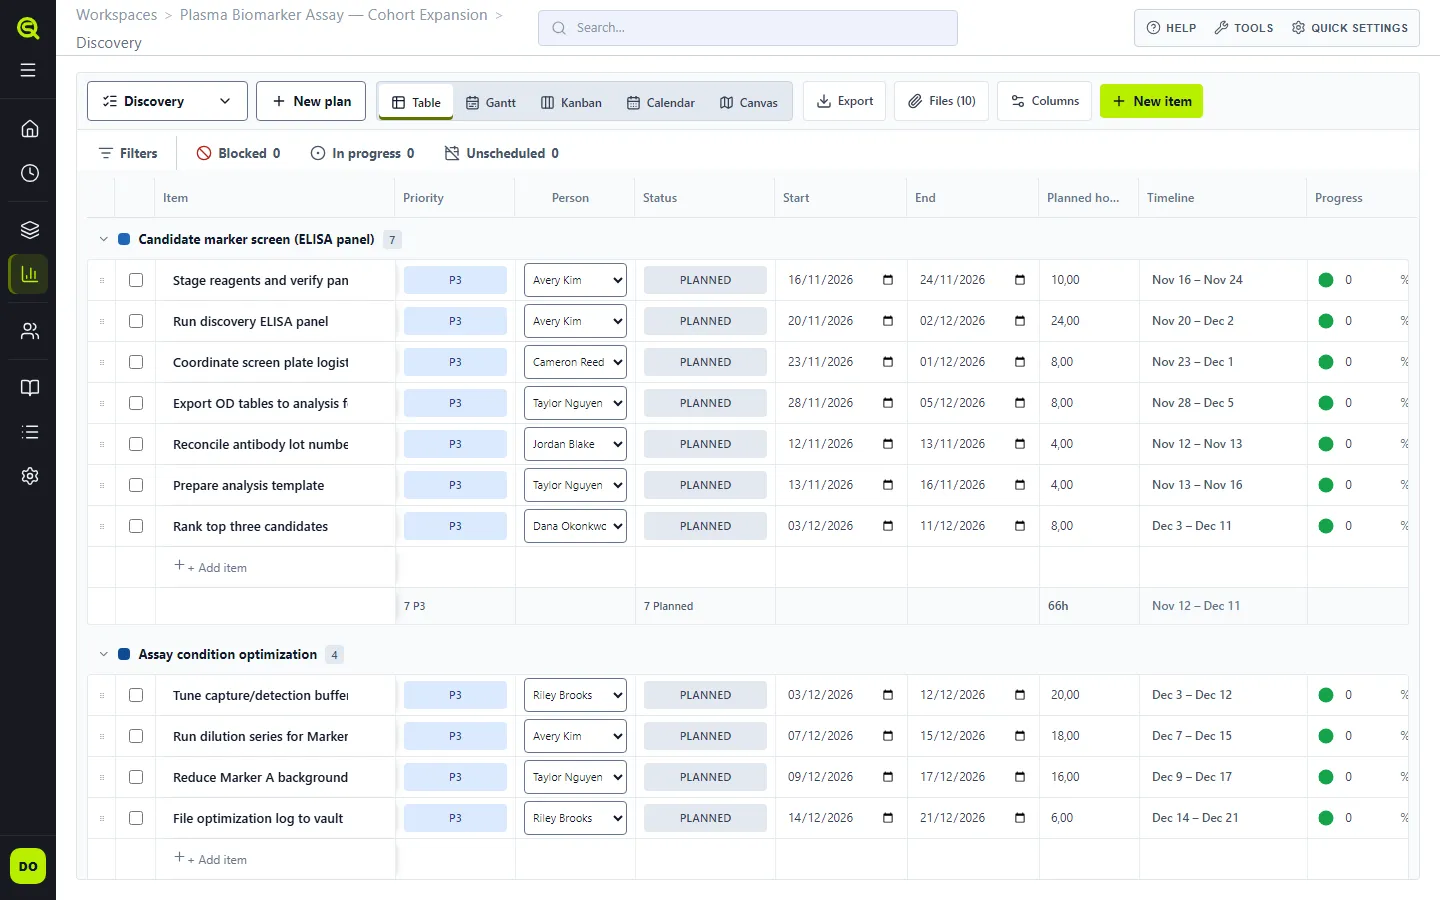
Opening a plan returns to the tab you last used in this browser. The first time, it opens on Canvas if the plan’s canvas has nodes, and on Table otherwise. Filters narrows the items shown by status, priority, assignee, work package or group, or by a search.
If you only use the plan views, an editor can turn on Hide Canvas tab in the plan’s menu (click the plan name). The tab is hidden for everyone on the plan, and the plan no longer opens on it. Links to the canvas or to one of its nodes still open the Canvas tab, which shows while it’s open. Using Sauriq for plans only walks through working this way.
Plans and canvases
Section titled “Plans and canvases”Every canvas has exactly one plan behind it, and each task on a canvas Task Board is an item in that plan. Edit a task in either place and the other follows. A plan can also exist on its own, with no canvas, for work you’d rather manage as a list.
Each canvas node with tasks shows as a group in the Table and Gantt, named after the node. A row you add under that group becomes a new task at the end of the node’s Task Board, so it shows on the canvas too. You need to be able to edit that node’s canvas; otherwise the row isn’t added and you see why. Rows added under any other group are plan-only items. To give a node its first task, add it on the canvas.
If a task is removed from its Task Board, or its node or canvas is deleted, while its item still exists in the plan, the item is marked Orphaned in the item details and Unlinked in the Gantt. It keeps its dates until you archive or delete it. Canvas review and milestone items leave the plan with their node. Items created by hand keep their data and lose only the node link.
An item carries:
- Status: Planned, In progress, Blocked or Done
- Priority: P1 (highest) to P5
- Assignee, plus Additional people from the workspace’s members
- Start and End dates, Progress and Planned hours. Progress moves in 10% steps; a typed value rounds to the nearest 10 when it saves
- Planned effort is kept in hours. The h / d switch in the Table’s Planned column header shows and takes it in hours or in days of 8 hours, in the table and in the item details. The choice is saved with the plan for everyone, and exports and imports stay in hours
- Group, Labels and a Description
- Work package: by default the plan’s work package; see Work packages
- Files, Comments and an Activity history
Review items appear in the plan once they have an assignee or have started.
Edits save automatically. Text and numbers typed in Table cells save after a short pause or when you leave the cell. Status, person and date selections update immediately. A failed save stays marked on that item while other pending edits continue saving. If a colleague changed the same item first, Sauriq reloads their version instead of overwriting it and tells you. Archive hides an item from the default views, and Restore brings it back; Delete removes it for good.
An item’s Activity history records changes including progress, planned hours, additional people, work package and linked canvas nodes. Reordering items alone adds no activity entry.
Dates follow the same rules in the Table, the item details and when you change several selected items at once. A start after the end moves the end with it, and an end can’t come before the start: for selected items, Sauriq says so and changes none of them. Clearing either date clears both, and the item goes back to the Scheduling inbox. If some of the selected items can’t be deleted, the others are still removed, and the ones left stay selected.
Managing plans
Section titled “Managing plans”The plan name at the top of the page opens the plan menu. It lists the workspace’s plans to switch between, and for the open plan offers Rename, its Work package, Hide Canvas tab, Import…, Archive and Delete. New plan beside it creates a plan; see Create another plan. A plan with a canvas can’t be deleted until its canvas is unlinked or deleted.
Export
Section titled “Export”On the Table tab, Export downloads the plan as a CSV file named after the plan and
today’s date, for example Assay rollout 2026-10-26.csv. Choose:
- Current view: the rows the Table shows, with your filters and sort, and its visible columns in the Table’s order. Timeline and Files aren’t exported.
- All columns, all items: every item that isn’t archived, with every column below.
The file uses the Sauriq plan file format: one row per item, with
the same English headers in the same order whatever your language. Dates are YYYY-MM-DD,
people are their email addresses, and Depends on lists upstream items by their ID. The
file is UTF-8, so spreadsheet apps show accented names correctly, and a cell that starts with
=, +, - or @ gets a leading ' so spreadsheet apps don’t run it as a formula.
Import from a spreadsheet
Section titled “Import from a spreadsheet”Import turns a spreadsheet into plan items: a file you exported from Sauriq, the template, or any
.csv or .xlsx file with one row per item. Only workspace editors can import. Start from:
- the plan menu (select the plan name): Import…, then New plan from file or Add to this plan;
- the plan directory: New plan from file.
An empty Table or Gantt offers Add item instead; to fill an empty plan from a file, use Import… > Add to this plan in the plan menu.
The import dialog takes three steps:
- Choose a file: a
.csvor.xlsxof up to 5 MB. Only the first sheet of a workbook is read. Download template gives you an empty plan file with two example rows. For a new plan, enter its name here. - Check the columns: choose the plan field each of your columns fills, or skip it. Common
column names, such as Task, Owner or Due date, are matched to a field for you.
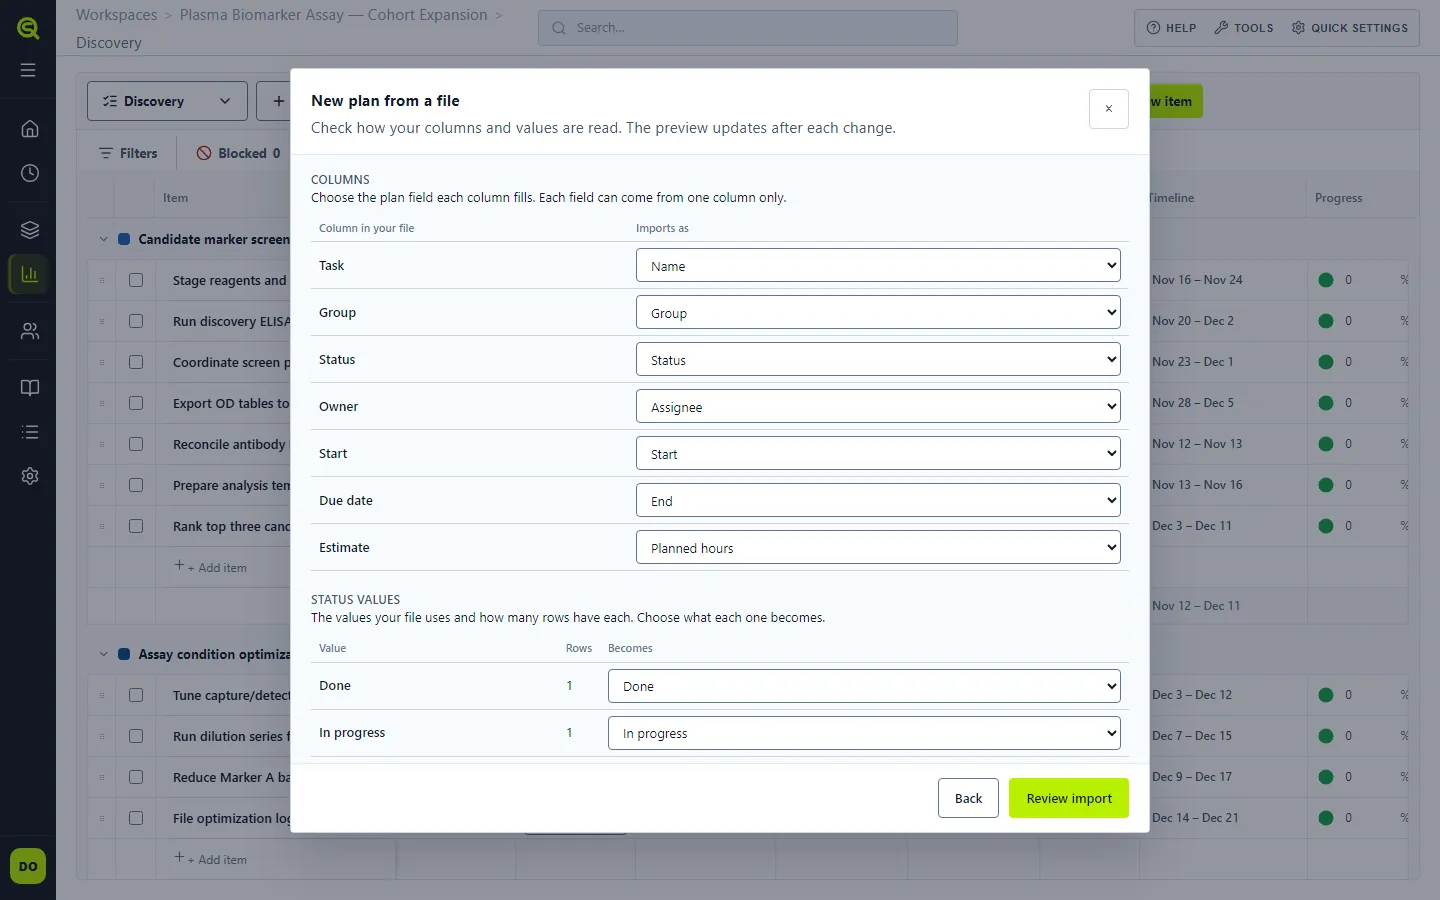
Choose what each status and priority value in your file becomes, and whether dates like
03/04/2026put the day or the month first. - Review import: see how many items, milestones, groups and dependencies come in, how many have no dates, and every problem the file has. Warnings don’t stop the import: the row is skipped, or comes in without that value. Errors, such as a file without a Name column, have to be fixed in the file first. Nothing is written until you select Import.
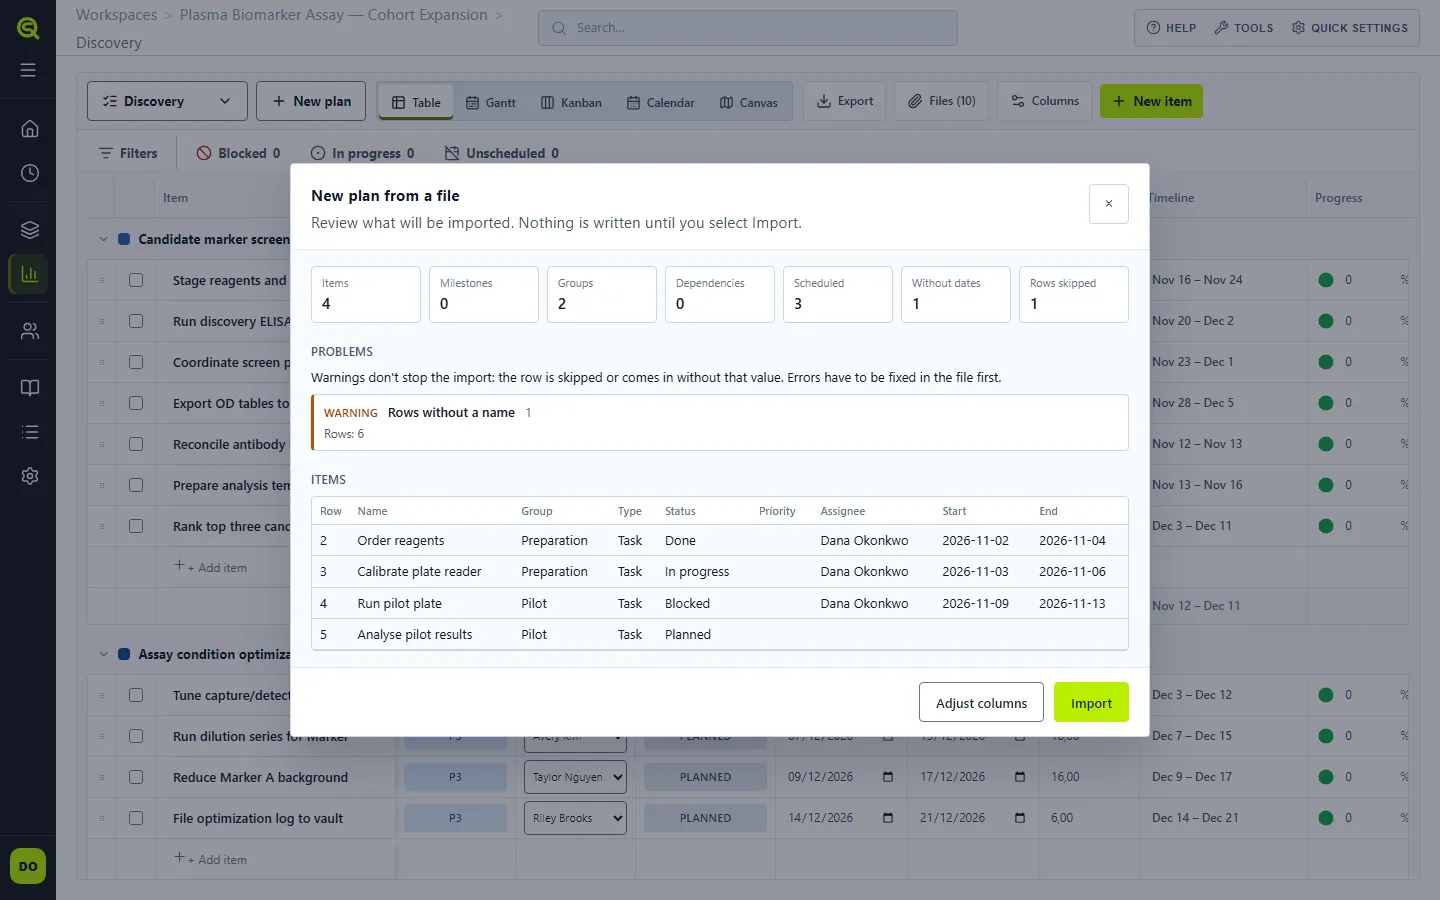
Import only adds items. Add to this plan puts the new items after the plan’s existing ones and never changes or removes them, and a Depends on entry can name an existing item of that plan. Imported items take the plan’s work package. Dates come in as they are, without rescheduling, and items without dates wait in the Scheduling inbox. The file itself isn’t kept. The workspace’s Activity log records each import under Plans, with the number of items.
How each column and value is read is on the Plan file format page.
Prepare a spreadsheet
Section titled “Prepare a spreadsheet”- Save your list as
.xlsxor.csv. - Open the file and delete any title or group heading rows, so the first row is the column headers and every row below it is an item. If you want to keep the groups, add a Group column first and fill it in. Alternatively, paste your rows into the template from Download template.
- In Sauriq, choose New plan from file and select the file. Check that your name, person, status and date columns import as the right fields, and choose what each status becomes.
- Select Review import, check the problems, then Import.
The Gantt
Section titled “The Gantt”The Gantt shows items as bars on a Day, Week or Month scale. Day heads the timeline with months over single days, Week with months over ISO week numbers, and Month with years over months; the grid lines follow the same unit. Bars always start and end on their exact days. In an empty plan the Gantt offers Add item, which adds an item from today for a week to General; only workspace editors see it.
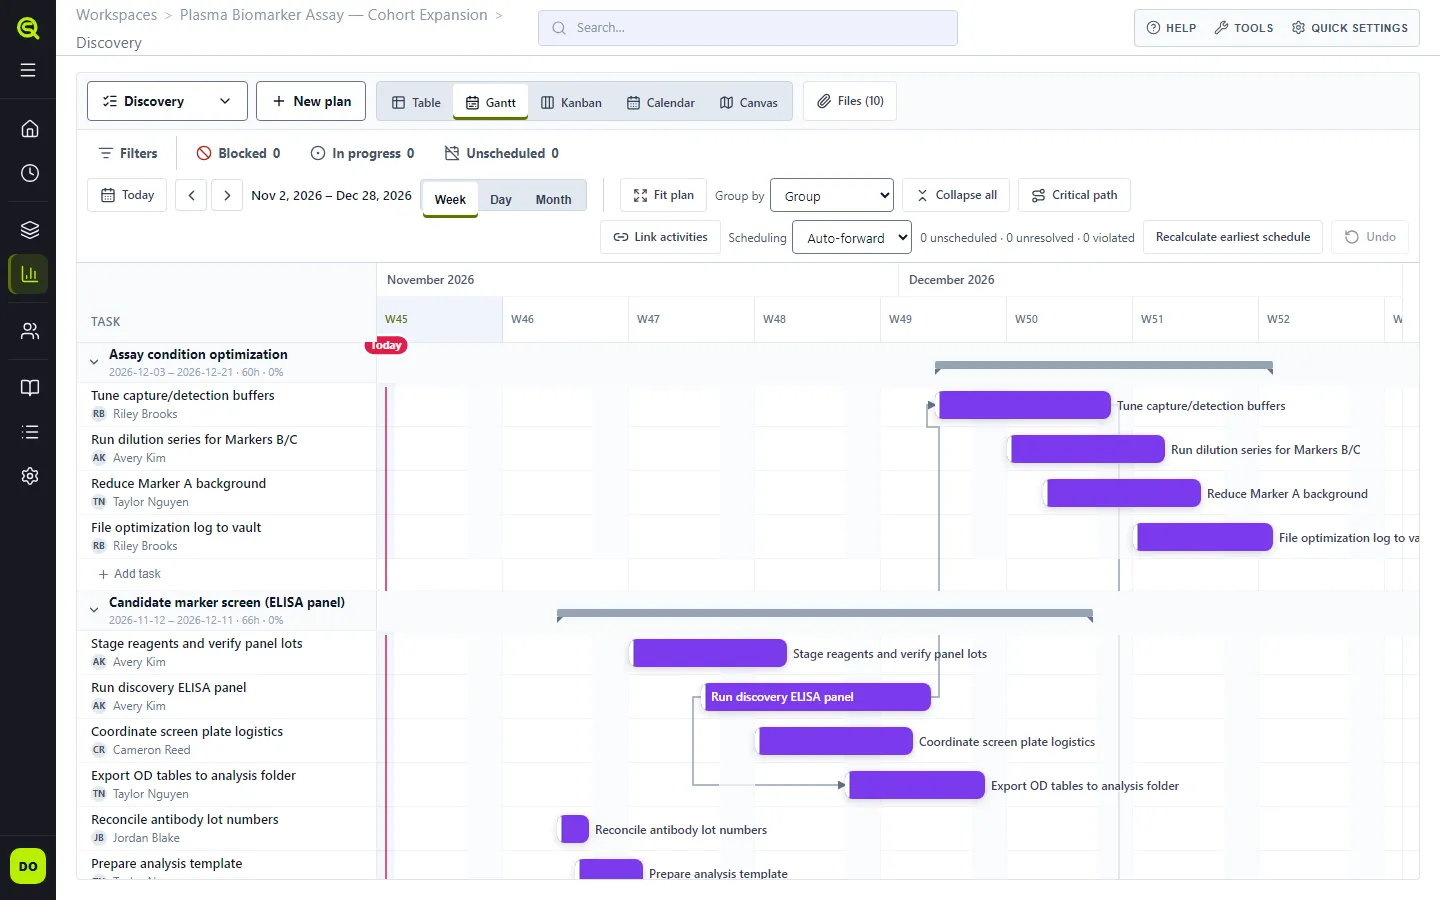
Drag a bar to move it, or drag its ends to change its dates. Moving several selected bars at once counts as one change for Undo. Dragging a bar or its ends back to the original date leaves its dates unchanged.
While you drag a bar, its start stops at the first date shown and its end at the last, if that end was in view when you started. An end that is already out of view moves with the bar by the same number of days and is never pulled back into view. Arrow keys can move bars past the edge, and the Gantt then shifts its dates to show them.
- Fit plan zooms to show the whole plan.
- Group by sorts bars by Group, Assignee, Status or Work package. Expand all and Collapse all open or close the groups.
- Critical path highlights the chain of items that sets the plan’s end date.
- At Day and Week, weekends and team members’ days off are shaded, using the schedules in Teams. If those can’t be loaded, only weekends are shaded and a warning says so. Month leaves days unshaded.
- Items marked Done show as 100% complete, whatever their stored progress.
Items without a group sit together under General (shown in your language) on the Table, the Gantt and the Kanban cards. Dragging an item there leaves it in that same group.
Your column width, grouping and collapsed groups are remembered in your browser, not shared with colleagues.
Unscheduled work
Section titled “Unscheduled work”Items without dates wait in the Scheduling inbox beside the timeline. Drag one onto the timeline, or select several and choose Schedule selected to give them dates.
An item is unscheduled when it has neither a start nor an end date. One with only one of the two is unresolved instead, and it’s counted there. The Unscheduled chip at the top of the plan counts the whole plan and ignores filters; the inbox and the count next to Scheduling follow the filters, and the inbox shows “x of y” when a filter hides some.
Dependencies
Section titled “Dependencies”A dependency says one item can’t move freely relative to another. Any member of a research workspace can add one. In the Institution Workspace, you need to own the plan or be an institution owner or admin. See The Institution Workspace.
To add a dependency:
- On the Gantt tab, choose Link activities.
- Select the upstream item, then the item that depends on it.
- In Dependency details, confirm the type and the lag in days.
An arrow joins the two bars.
Select an existing dependency to change its type or lag, or to delete it. The types are:
| Type | Meaning |
|---|---|
| FS (finish to start) | The second item starts after the first finishes |
| SS (start to start) | The second item starts after the first starts |
| FF (finish to finish) | The second item finishes after the first finishes |
| SF (start to finish) | The second item finishes after the first starts |
Lag is extra calendar days between the two. A negative lag (a lead, such as -2) lets the second
item overlap the first by that many days. An empty lag field saves as 0.
Dependencies belong to the plan. They are separate from the links between nodes on a canvas, which show the flow of the experiment but don’t move dates.
Scheduling mode
Section titled “Scheduling mode”Scheduling sets what happens when a date change breaks a dependency:
- Manual: dates move only when you move them. Sauriq counts the problems next to the mode, as unscheduled, unresolved and violated, so you can fix them yourself.
- Auto-forward: when an item moves later, the items that depend on it move later too. Items never move earlier on their own.
A scheduling-mode change is shared with colleagues who have the plan open; their view updates on its next background refresh.
Recalculate earliest schedule pulls every scheduled item back to the earliest dates its dependencies allow. Undo reverses the last scheduling change.